How To Truss A Chicken
At a Glance Trussing a chicken involves tying the legs together and securing the wings against the body to create a compact shape for even cooking. This method promotes uniform heat distribution, prev…
Trussing a chicken involves tying the legs together and securing the wings against the body to create a compact shape for even cooking. This method promotes uniform heat distribution, preventing the legs and wings from overcooking while the breast remains moist. Proper trussing results in a golden-brown, juicy bird that holds its shape on the plate and requires no special tools.
Getting a chicken ready for the oven can seem tricky, but it’s actually quite simple once you know how. Properly trussing your bird helps it cook more evenly, keeps the juices inside, and makes it look much nicer on your plate. This technique ensures your chicken is golden brown and delicious all over.
Learning How to Truss a Chicken will make your roasting efforts much more successful and impressive.
Key Takeaways
- Trussing helps a chicken cook evenly for a perfect roast.
- It keeps the juices inside, resulting in a more moist and flavorful bird.
- A trussed chicken looks more appealing and holds its shape better when served.
- The process is straightforward and doesn’t require special tools.
- Trussing can also help tuck in smaller parts like wings and legs for a neater presentation.

Why Trussing Your Chicken Matters
Trussing a chicken might seem like an extra step, but it makes a big difference in your final dish. When you don’t truss a chicken, the legs and wings can spread out. This means they might cook faster than the breast meat, leading to dry breast meat and undercooked thighs. By tying the chicken up, you create a compact shape. This allows the heat to circulate more evenly around the entire bird.
The benefit of this even cooking is a more tender and juicy chicken. All the natural juices stay locked inside the meat. This means every bite is flavorful and moist.
Plus, a trussed chicken looks much more professional and appealing when it comes out of the oven. It’s a simple trick that really elevates your home cooking. Learning How to Truss a Chicken is a skill that pays off with every roast.

Understanding the Basics of Trussing
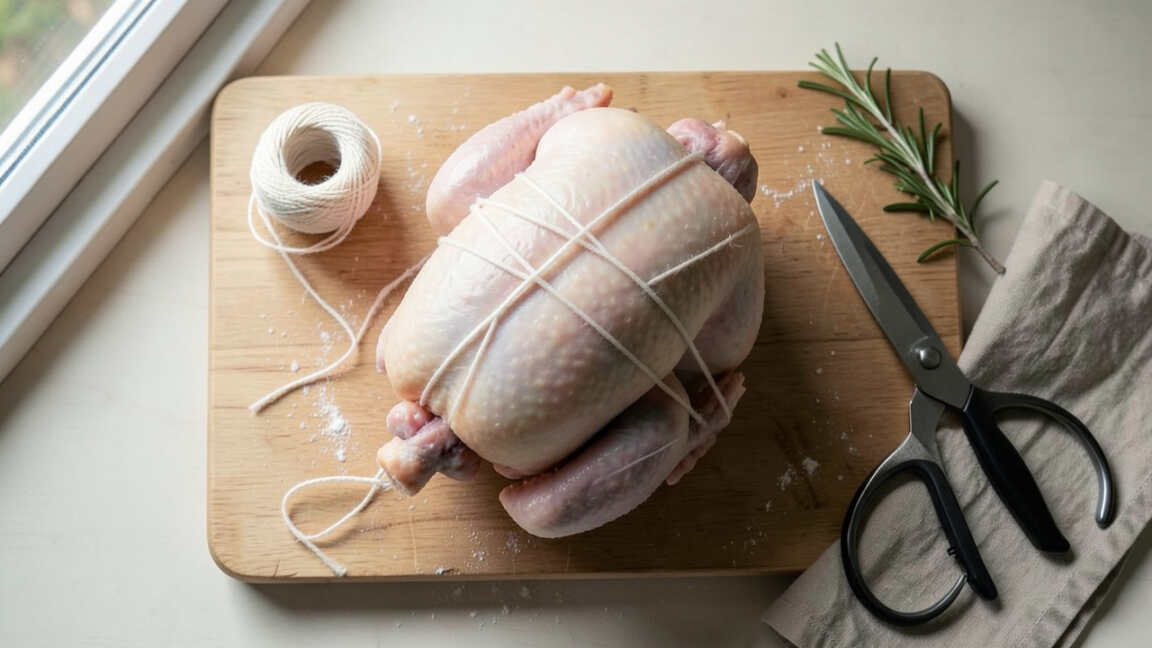
Before you start, it’s good to know what you’re aiming for. Trussing is essentially tying the chicken’s legs together and tucking its wings. This creates a neat package. The goal is to keep everything in place while it cooks. You don’t need fancy equipment. A simple piece of kitchen twine is all you really need. Some people also use toothpicks for smaller bits, but twine is usually enough.
Think of it like preparing a gift. You want everything to be snug and tidy. This helps the chicken maintain its shape.
It also prevents any parts from drying out too quickly. Understanding the goal makes the process of How to Truss a Chicken much clearer.

Gathering Your Supplies
You don’t need a lot of fancy gadgets to truss a chicken. Most kitchens will have what you need. Having these ready will make the process smooth.
Here’s what you’ll want:
- Kitchen Twine: This is the most important tool. Look for unbleached, food-safe twine. It should be strong enough to hold the chicken securely.
- Sharp Knife: You might need this to trim any excess fat or loose skin.
- Cutting Board: A clean surface to work on.
- Paper Towels: For drying the chicken before you start.
That’s it! With just a few simple items, you’re ready to learn How to Truss a Chicken.

Step-by-Step Guide: How to Truss a Chicken
Let’s get to it! This is where you’ll learn the actual steps. It’s easier than you might think. Follow these instructions, and you’ll have a perfectly trussed chicken in no time.
- Prepare the Chicken: First, remove the chicken from its packaging. Rinse it inside and out under cold water. Pat it completely dry with paper towels. This is a crucial step for crispy skin.
- Prepare the Twine: Cut a long piece of kitchen twine. It should be long enough to wrap around the chicken twice. You’ll need about 2 to 3 feet of twine, depending on the size of your chicken.
- Position the Twine: Lay the twine flat on your cutting board. Place the chicken breast-side up on top of the twine. You want the twine to run under the bird, from side to side.
- Tie the Legs Together: Bring the ends of the twine up and over the legs. Loop the twine around the legs and pull them together snugly. You want the legs to be tied tightly, but not so tight that you break the skin.
- Cross the Legs: Once the legs are tied, cross them over each other. Then, wrap the twine around the crossed legs a couple of times to secure them.
- Tuck the Wings: Next, take the wings. Fold them back under the body of the chicken. This keeps them from burning and helps create a compact shape.
- Secure the Twine: Bring the two ends of the twine that you used for the legs up towards the neck cavity. You can tuck them under the back of the chicken or tie them around the neck area. The goal is to keep everything neat and tight.
- Tie Off: Tie a secure knot with the twine. Make sure it’s snug enough to hold everything in place but not so tight that it cuts into the meat. You can trim any excess twine if needed.
- Final Check: Look at your chicken. It should have a neat, compact shape. The legs should be tied together, and the wings tucked in. You’ve now successfully learned How to Truss a Chicken!
It’s really that simple. With these steps, you can confidently truss any whole chicken you cook.
Alternative Trussing Methods
While the basic twine method is most common, there are a couple of variations you might encounter or find helpful. These can be useful depending on the tools you have or the specific cut of chicken.
The “Spatchcock” or Butterflied Method
This isn’t exactly trussing in the traditional sense, but it’s a related technique for getting even cooking. Spatchcocking involves removing the backbone of the chicken and flattening it out. This allows the entire bird to lie flat.
Benefits of Spatchcocking:
- Faster Cooking: Because the chicken is flat, it cooks much faster.
- Even Browning: All parts of the chicken are exposed to direct heat, ensuring even browning.
- Crispier Skin: The flattened shape allows more skin to be exposed, leading to wonderfully crispy skin.
To spatchcock, you’ll need strong kitchen shears or poultry shears. You cut along both sides of the backbone, remove it, and then press down on the chicken to flatten it. This method is great for grilling or roasting.
Using Skewers or Toothpicks
For some people, handling twine can be a bit fiddly. In these cases, skewers or toothpicks can be an alternative.
You can use skewers to pierce through the skin and meat to hold the legs together. Similarly, toothpicks can be used to secure the skin over the cavity opening or to hold tucked wings in place. This method is often used for smaller birds or when you want a very precise hold.
While these methods achieve a similar goal, the traditional twine method is generally considered the standard for learning How to Truss a Chicken for roasting.

Why Even Cooking is So Important
Even cooking is the main reason people learn How to Truss a Chicken. When a chicken cooks unevenly, you end up with a mix of textures and temperatures. The breast meat, being leaner, can dry out very quickly. The legs and thighs, with more fat and connective tissue, need longer to become tender and juicy.
A properly trussed chicken ensures that the thickest parts (like the breast) and the thinner parts (like the wings) cook at a similar rate. This prevents the breast from becoming tough and overcooked while the thighs are still underdone. It allows the heat to flow around the entire bird, giving everything the right amount of time to reach its ideal temperature.
The Science Behind Even Heat Distribution
Heat transfer is key here. In an untrussed chicken, the legs and wings stick out. These areas are exposed to more direct heat and air, causing them to cook faster. The body cavity can also trap steam, which cooks the meat from the inside. However, without a compact shape, the heat doesn’t reach all parts of the meat uniformly.
Trussing compacts the bird. This forces the heat to work its way around the entire shape. It reduces the surface area of the exposed extremities.
This helps to equalize the cooking time. It’s a simple physical adjustment that leads to a much better culinary outcome.

Tips for Perfect Trussing and Roasting
Once you’ve mastered How to Truss a Chicken, a few extra tips can make your roast even better. These small details can elevate your cooking from good to great.
Seasoning is Key
Don’t forget to season your chicken generously before trussing and cooking. Salt, pepper, herbs, and spices rubbed all over the bird, including under the skin, will add fantastic flavor.
Seasoning Tips:
- Under the Skin: Gently loosen the skin over the breast and thighs. Rub butter, herbs, or spices directly onto the meat.
- Cavity Seasoning: Stuff the cavity with aromatics like lemon halves, garlic cloves, onion wedges, and fresh herbs like rosemary or thyme.
- Salt and Pepper: A good rub of salt and pepper on the outside is essential for crispy skin and overall flavor.
Oven Temperature Matters
The temperature of your oven plays a big role. A common method is to start with a high heat (around 425°F or 220°C) for the first 15-20 minutes. This helps to brown the skin. Then, reduce the temperature to around 350°F (175°C) for the remainder of the cooking time to ensure the inside cooks through without drying out.
Using a Meat Thermometer
The most reliable way to know if your chicken is cooked is by using a meat thermometer. Insert it into the thickest part of the thigh, without touching the bone. The internal temperature should reach 165°F (74°C). The juices should also run clear when you pierce the thigh with a fork.
Resting the Chicken
This is a step many people skip, but it’s vital. After the chicken is cooked, let it rest for at least 10-15 minutes before carving. Tent it loosely with foil. This allows the juices to redistribute throughout the meat. If you cut into it too soon, all those delicious juices will run out onto the cutting board.
Mastering How to Truss a Chicken is just the first step to a perfect roast. These additional tips will help you get the most out of your efforts.

Common Mistakes When Trussing a Chicken
Even with clear instructions, it’s easy to make a few common mistakes. Knowing these can help you avoid them and ensure your trussing is successful.
Here are some pitfalls to watch out for:
- Tying Too Tightly: Pulling the twine too tight can break the chicken’s skin. This can lead to uneven cooking and a less attractive presentation. Aim for snug, not constricting.
- Not Drying the Chicken: As mentioned, a wet chicken won’t get crispy skin. Always pat it very dry before you start trussing and seasoning.
- Forgetting to Tuck Wings: Leaving the wings sticking out can cause them to burn before the rest of the chicken is cooked. Make sure they are tucked securely under the body.
- Using Too Little Twine: If your twine is too short, you’ll struggle to tie it securely. Cut a generous length to give yourself plenty of room to work.
- Over-Trussing: Sometimes people try to tie too much. The goal is to hold the main parts in place, not to create a rigid, overly tight package. Keep it simple and effective.
Avoiding these common errors will make learning How to Truss a Chicken much more rewarding.
Frequently Asked Questions
What is the main benefit of trussing a chicken?
The main benefit of trussing a chicken is to ensure it cooks more evenly, resulting in moist breast meat and tender thighs, and a more attractive presentation.
Do I need special tools to truss a chicken?
No, you don’t need special tools. A long piece of food-safe kitchen twine is usually all you need to learn How to Truss a Chicken.
Can I truss a chicken without twine?
Yes, you can use skewers or toothpicks to hold parts of the chicken together, though twine is the most common and effective method.
How long should the kitchen twine be?
You’ll need a piece of twine about 2 to 3 feet long, depending on the size of your chicken, to comfortably tie it.
When should I truss the chicken?
You should truss the chicken after you’ve patted it dry and seasoned it, but before you put it in the oven.
How do I know if my chicken is cooked after trussing?
Use a meat thermometer inserted into the thickest part of the thigh. It should read 165°F (74°C), and the juices should run clear.
Final Thoughts
Learning How to Truss a Chicken is a simple step that significantly improves your roasting results. It ensures even cooking, keeps your chicken juicy, and makes it look beautiful on the table. With just a bit of twine and these easy steps, you can confidently prepare a delicious, perfectly cooked chicken every time.